Get Started with TimeTrack in 7 Easy Steps

#
TimeTrack_TItelbild

We know exactly how overwhelming it can be to try something new. However, with the right assistance, switching to a new way of working becomes a piece of cake. If you and your company have decided to switch to a modern time tracking solution, implementing the system in your business should not be a hurdle. That’s why we have set ourselves the goal of making TimeTrack as simple and intuitive as possible. To make it even easier to get started with TimeTrack, we have summarized the most important steps for you. By following these instructions, you can optimally adapt the tool to your individual needs and tailor it to your operation. Let’s get started right away.

Step 1: Create User


Set Up User Profile

You define the user profiles of all employees in Data Administration > Users. First, you create the data of your users, select their respective function (team leader, admin, external, etc.) and save everything. For each user you add a password. We recommend that you simply create one password for all users, since each user must set his or her own password as soon as he or she has access to the profile.

User Profile Settings

TimeTrack – User Profile

Add Working Hours Model

You can or should create a working hours model for each user. You do this directly in the user profile under Working hours model > Show settings. Working time models store the employment relationships of all employees and provide an exact overview of their working hours. The working time model is especially important for the vacation entitlement and the timesheet of the employees. The vacation entitlement is always calculated depending on the most current working time model. The timesheet, in turn, uses the target hours from the working time model and can thus calculate the actual working hours for each employee.


Add Working Hours Model

TimeTrack – Create Working Hours Model 

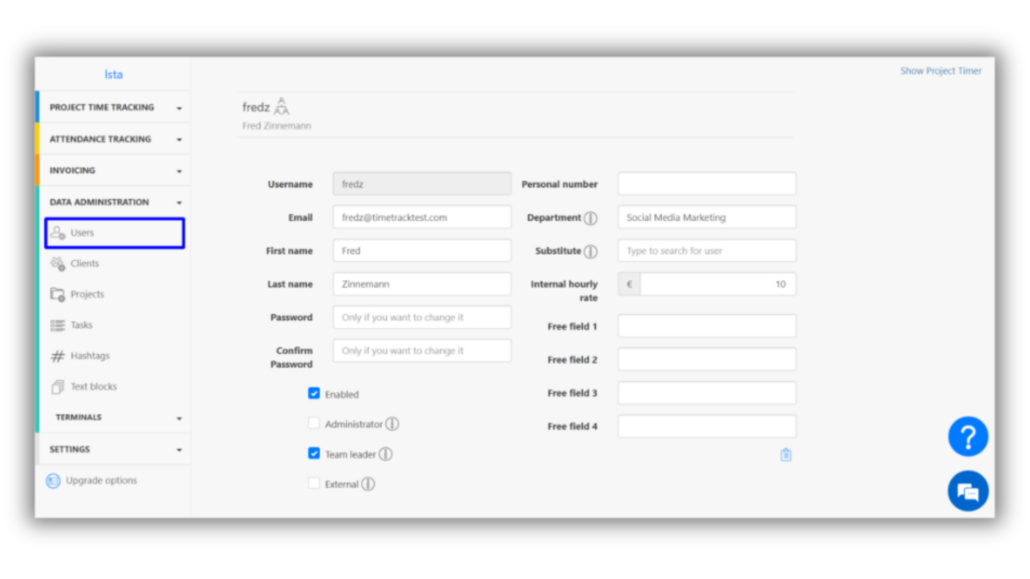
Important: For each user, specify whether the timesheet is created based on working or project times. In TimeTrack, a distinction is made between legal working hours/attendances and project times. (If you are only interested in project times, employees must track their working times under the Project Time Tracking menu item. However, if you are only interested in the legal working hours/attendances of the employees, then the employees only need the time clock, which can be found in the Attendance Tracking menu.)

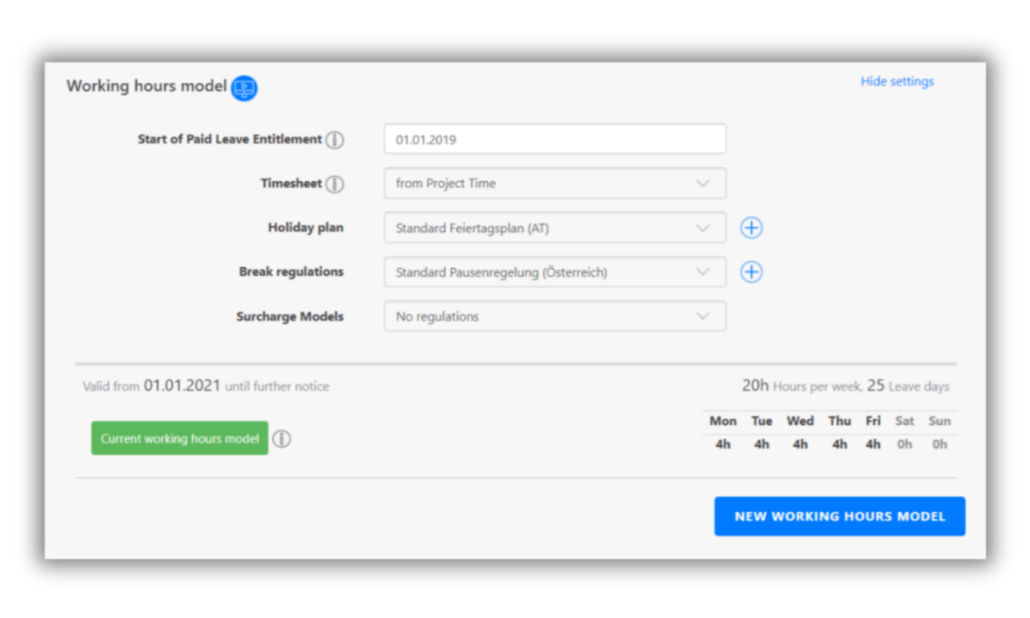
When creating a new working hours model, you should pay attention to the following points:

  • Valid from” – here you define when employees joined the company. Otherwise, the minus hours of the last few months will be displayed unless you enter all past working hours retrospectively. You can also create several working time models for one employee by optionally defining the period by the “Valid to” field. The system will automatically, adopt on the new validity day, the subsequent working time model that has been stored, and will take into account all changes compared to the old model, such as the vacation entitlement, etc.
  • Fill in the weekly schedule with the target working hours,
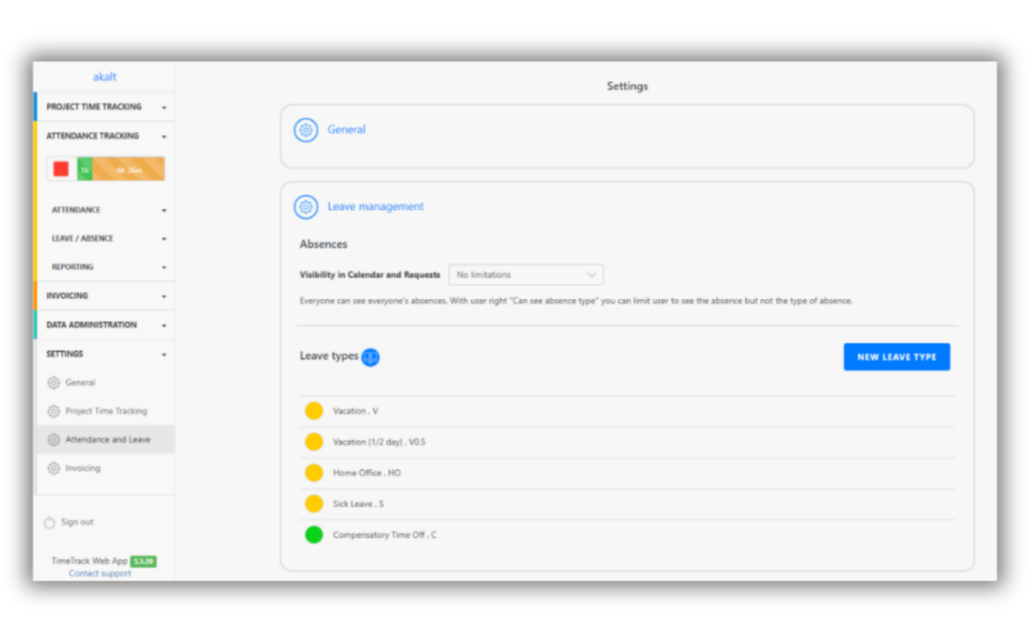
  • Calculate leave entitlement – depending on the location of your company, employees are entitled to a different legal leave entitlement.
  • You have the possibility to save each working time model as a template – this is especially useful if many users have the same model.

Add Working Hours Model

TimeTrack – Add Working Hours Model 


Selecting the Holiday Schedule and Break Regulations

Depending on which country or state users are in, different holidays apply. You can easily add the right holiday schedule for users directly in the user profile. The same applies to the break schedule. This can be created individually and assigned differently depending on the employees. In contrast to the holiday schedules, the break regulations do not differ between the federal states.

To do this, go to Settings > Attendance and Leave > Break Regulations or Holidays.

Settings Holiday and Break Regulations

TimeTrack – Set break regulations and holiday schedule


Add overtime or paid leave carry-overs

TimeTrack’s overtime carryover allows you to transfer overtime from last year to the current year. To do this, go to Attendance tracking > Attendances > Hours reports. You can also create a paid leave carryover. This way you transfer vacation days which were not used to the current year. You can also enter additional vacation days which an employee receives as a bonus. To do this, go to Attendance tracking > Leave/absence > Paid leave reports.


7-steps-with-timetrack-overtime-carryover

Define User Rights

You have the option to individually distribute up to 60 permissions for all employees and thus define exactly which employees have which user rights.

The following 4 user rights are particularly important:

  • Who may approve leaves of absence
  • Who is allowed to edit entries
  • Who is allowed to see amounts and hourly rates
  • Who may create and edit new customers/projects/users etc.

Define User Rights

TimeTrack – Define User Rights

Invite Users

Once users have received an invitation by email, they must enter their own password and can start using TimeTrack.

Step 2: Create Customers


You can create customers manually by entering the customer data directly into the system. However, you can also easily import your customer data. You do this via Settings > General > Data Import. Simply upload the CSV file and TimeTrack will automatically import the data. We have created templates for you that show you how to best document your customer data so that TimeTrack can import it without any problems.

Data Import for Clients

TimeTrack – Data Import for Customers

Click here for data import instructions.

If you want to connect TimeTrack to a system you already use, you can also easily transfer your customer data from there. We currently offer an interface to systems like QuickBooks and more.

Step 3: Create General Activities


You can create or import activities manually just like customers. Activities include your daily tasks like meetings, accounting, customer meetings, website optimization etc. Define them in advance so that users can easily book their working hours to the correct task area. This way, activities remain consistent, which not only simplifies time tracking for employees, but also makes project reporting clearer.

Step 4: Create Projects


The same applies to your project data. You can create or import your projects manually. Important when entering projects manually:

  • Select client
  • Define project name
  • Set project hour rate
  • Save the basic data for the first time
  • Open project again
  • You can assign the project to the responsible users. This allows employees to book time only on the projects that have been assigned to. This not only saves time, but also reduces errors and provides a better overview.
  • Rough project planning – first define the project duration and the project budget.

Create Project

TimeTrack – Create Project

Project planning is distinguished between rough planning and detailed planning. In the rough project planning you define the general project duration, as well as the total budget. In detailed project planning, as the name suggests, you go more in depth. Here you can do the following:

  • Define tasks, there is a possibility to import your tasks.
  • Plan tasks – for each individual task you want to complete as part of the project, you can set both a duration and a budget.
  • You will come across a checkbox that configures whether only activities that have been predefined as part of project planning may be used during time tracking. These will then also only be available for selection.
  • Plan expenses.
  • When you have filled in everything, save the whole thing.

Step 5: Adapt Absences


TimeTrack already offers you some absence types. If an absence is not available that you need in your daily work, you have the possibility to create individual absences.

For example, home office or training.

For this go to Settings > Attendance and Leave > Leave Management > New Leave Type. Two points are important when creating new absence types:

  • Pay attention to whether the absence is a vacation day
  • Pay attention to whether the absence requires hours deduction

Leave Management Leave Types

TimeTrack – Leave Types

Step 6: Create Organisation Structure


For those companies that have several locations or work with departments, we recommend creating a company structure. To do this go to Settings > Attendance and Leave > Organisation Structure. Then proceed as follows: 

  • Create New Location
  • Create department, Define team leader and allocate your employees

This allows you to view and evaluate the entered data of your employees on a department- or location-specific basis.

Organisation Structure

TimeTrack – Company Structure

Step 7: Delete all Demo Data


After you have successfully mastered all the above steps, finally the demo data provided by us can be easily removed. This demo data should first give you a feel for the software and the individual modules. The deletion is possible in two ways:

  • Click on the blue question mark located in the lower right corner. The window that appears contains the “Remove Demo Data” box.
  • Otherwise you can delete them via Settings > General > General > Delete all Time Entries and Expenses.

Now you can view unaltered into your tracked data and access accurate analysis.

The Bonus Step – the Terminal App


With the TimeTrack Terminal App you can fully automate your attendance tracking. Simply download the app to an Android tablet of your choice and attach the device to the wall. Employees can clock in and out directly on the tablet using NFC/RFID tags (keycard, key ring, NFC sticker), a pin code or password. The best part is that the terminal is directly connected to our web and mobile app. All stampings are immediately visible. This keeps everything simple and clear for all companies that prefer stationary time tracking.

How to configure everything step by step can be found in our TimeTrack Terminal App guide.

Attendance-Tracking-Terminal-ClockIn

To further assist you on your time tracking journey, we also offer explainer videos and support via email, chat and phone.